Showing posts with label icing. Show all posts

Friday, 6 December 2013

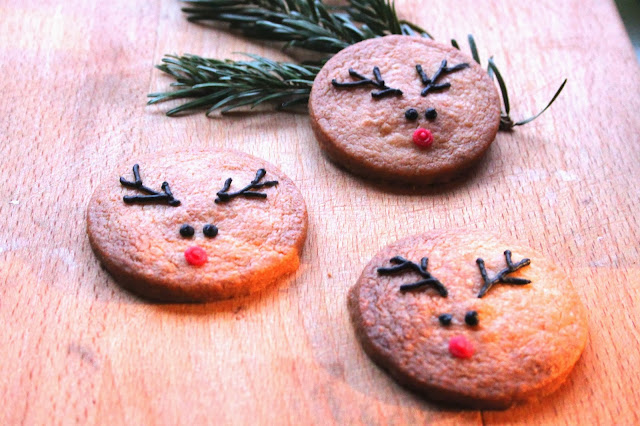
Reindeer Cinnamon Shortbreads


I've been hunting* for a deer head for my dining room for a long time now and if I am blaming this on anyone, then it is going to be Katie from Hook, Line and Sink HerHer beautiful post filled with these antlered wonders has made me want something that I didn't realise that I wanted.  And the last time that happened was with a taxidermy monkey (I will probably tell you about this at some point... But for now, let's just say that he was majestic and I am kick myself daily for not buying him)

 The dining room is the most sensible option. But, as I often struggle with simple decisions such as what I want for breakfast, I am struggling to decide on which wall. I did the sensible thing of making these reindeer Ruldolf-esque shortbread cookies and then wandering around the room and holding them up in front of each wall to figure out positioning and scale.  And then eating them. 


(*not literally. 2013 hunting - MacBook, sofa, cup of tea, lapful of cat)

I saw this icing idea on Pinterest and they are perfect for Christmassing up a round shortbread disc. 

Ingredients
125gr butter
65gr caster sugar
190gr plain flour, sifted
1/2 tsp vanilla extract
Small pinch of cinnamon

Red and black writing icing tubes

Method
1, Make the shortbread dough first by creaming the butter and sugar together.  Beat in the vanilla extract and cinnamon. It is up to you how much cinnamon you put in these as it depends on preference and also what type of cinnamon you have, some can be quite bitter. A little does go a long way.
2, Add in the flour and bring it together to form a ball of dough.  You might need a couple of extra tablespoons of flour.
3, Wrap this in clingfilm and pop in the fridge for at least 30 minutes.
4, When you're ready to bake, line a baking sheet with greaseproof paper and preheat your oven to 180o/c. 
5, Roll out the dough until it is roughly half a cm a thick and cut out rounds.  It doesn't matter how big or small you make these.  I managed to make around 16.
6, Place them onto your baking sheet and bake for 10-15 minutes or until just starting to turn golden brown.  They will be soft when you take them out of the over but will firm up when cooling so leave them to cool on the baking sheet or slide the cookies on the greaseproof paper off the baking sheet and onto a heatproof surface.
7, When they are completely cold, ice them by adding a large dot of red, and then piping eyes and antlers in black. Leave to set before storing them in an airtight container. 

Sunday, 2 September 2012

Brown Butter Apple & Carrot Cake (With Brown Butter Icing)

The first breaths of autumn caressed me this morning. The air, undoubtedly crisper. How long before the hazy hues of summer disappear into burnt umbers, mellow browns and warm yellows?

The first browning leaves swept under my feet as I hurried through the city. I pulled my pashmina tighter around my neck. Wondered how long it would be before I had to switch to a thicker scarf.

When I could trade in my bare legs for thick back tights. My outdoor lunches of salad to indoor lunches of soup. Cardigans for coats. Ballet pumps for boots. Bronzer for blusher.

Freshly plucked and pulled carrots and apples. Cozy brown butter. Autumn is coming.

Ingredients

Cake

75gr butter
125gr soft light brown sugar
2 eggs
150gr self raising flour
150gr carrots, roughly grated
1 large eating apple, cored and roughly grated

Icing
75gr butter
175gr icing sugar
Couple of tablespoons of water

Method

1, First make the cake by preheating the oven to 170o/c and line (or spray with cake release) an 8 inch square tin.
2, Melt the butter in a small saucepan over a medium heat until melted. Gently simmer it until it takes on a golden nutty brown colour and smell. Take off the heat immediately to prevent burning and let it cool slightly.
3, Beat the butter, eggs and sugar together. Fold through the flour until you have a smooth batter.
4, Fold through the grated carrots and apple until well combined.
5, Pour into your prepared tin and bake for 25-30minutes until springy to the touch and an inserted skewer comes out clean. Leave to cool completely before icing.
6, Make the icing by browning the butter in the same way as before, leaving to cool slightly again.
7, Whisk in the icing sugar and slowly add a couple of drops of water until you have a smooth, spreadable icing.
8, Top your cooled cake with the icing and serve.

Friday, 3 February 2012

Lemon and Blueberry Buttermilk Cake


I once had a dream where I lived in a house made of cake.  It was a tourist attraction and I was fighting a losing battle with sneaky people eating things. Like walls. I remember I 'escorted someone from the premises' because they took a bite out of my sofa.  

If that dream were real, this cake would be carved into my bed.  I would happily sleep in a bed made of this cake.  It's so light, fluffy and moreish.  I love how the blueberries stain the cake, little flecks of yellow lemon zest peak through and the icing glaze adds a tingle of sweetness.

Original recipe from here

Ingredients
250gr self raising flour
1/2 tsp baking powder
Small pinch of salt
125gr unsalted butter, room temperature
175gr caster sugar
3 eggs
200ml buttermilk
Finely grated zest of two medium sized unwaxed lemons
150gr blueberries
Juice of one of the lemons and icing sugar for the glaze


Method
1, Preheat your oven to 180o/c. Grease and flour, or spray with cake release, a 25cm round bundt tin.
2, Sift the flour, baking powder and salt together and set to one side
3, Cream the butter and sugar together until pale and fluffy.
4, Beat in the eggs with a couple of tablespoons of the flour to stop it splitting.
5, Beat in the buttermilk and lemon zest
6, Fold in the rest of the flour mixture until combined and then fold in the blueberries
7, Pour evenly into your bundt tin and bake for 25 to 30 minutes until risen, golden and an inserted skewer comes out clean
8, Mix the lemon juice with enough icing sugar to form a glace icing that is about the consistency of double cream.
9, Invert the warm cake onto a cooling rack and using a pastry brush, paint and cover the entire cake in the icing. Leave to cool and then drizzle on the remaining icing. 


Friday, 24 September 2010

Mini Baked Doughnuts

As part of my little work funfair bites, I made little baked doughnuts.


I used to be fascinated by those doughnut machines by the seaside when I was younger. The ones with the huge vat of batter at one end and the river of oil with the flipper in the middle? Like these ones!

I decided to make baked ones (not just because my new doughnut tin turned up *cough cough*) but because two day old fried doughnuts aren’t brilliant…


Makes around 24 mini doughnuts

Ingredients

140gr plain flour

80gr golden caster sugar

1tsp baking powder

½ tsp salt

1 egg

2 tbsp melted but cooled butter (plus extra for greasing)

250ml buttermilk

Method

Preheat oven to 180o/c

1, In one bowl sift together all the dry ingredients

2, In another bowl/jug mix in the wet ingredients together well

3, Pour the wet ingredients onto the dry ingredients and stir until just combined, like muffin batter

4, Line your mini doughnut tin well with melted butter and dust onto of that a little more plain flour, just to make sure they don’t stick. If your using a silicone mould then this shouldn’t be a problem!

5, Fill each little doughnut indent about half full with the batter. It is a pretty sticky and gloopy batter so I ended up putting it into a freezer bag, snipping off one of the corners and using it like a makeshift piping bag.

6, Bake for around 4-5 minutes until firm to the touch and risen.

7, Remove from the oven and take the doughnuts out of the tin and cool on a cooling rack.

8, Dip in icing and sprinkles, or chocolate, or douse with icing sugar or whatever takes your fancy. I know the next batch I’m making will involve cinnamon sugar…!